In this day and age, it seems like everyone is selling something online. Do you want to build your own eCommerce business or build an online Store, or maybe you’re just looking for a way to sell some of your stuff without having to go through the hassle of setting up a physical store?
Either way, building an online store is a great option – and it’s easier than you might think! In this post, we will promote how to build an eCommerce store with woocommerce by using the Astra theme. Furthermore, this guide will show you how you can promote your online store to get more profit.
What Do You Need To Build A Online Store?
One of the best strategies to boost your sales is to create an online store for your business or launch your digital store. If you have a product, an idea to launch a new product, or even want to resale any goods, then you absolutely must have an internet store.
Many people aspire to start their own websites and shop. If you want to create an online store without having to work hard or hire someone to do it, this article might be able to assist you. But before beginning, it is important to understand that a domain name and Web hosting are prerequisites for creating an online business.
WordPress, a WordPress theme(Astra is recommended), and the Woocommerce plugin are additional crucial resources for creating an online store. Acquiring a domain name and web hosting come initially, and then WordPress and WooCommerce follow. We will start by learning a little about WordPress, Woocommerce, and domain and web hosting.
Domain And Hosting
A domain name is the name or title of your website or online stores, and web hosting is necessary to launch your website on the internet. Web hosting provides a Specific space and Speed to your website; having a fast website is a good sign of a good User experience.
You can buy Domain name and Web hosting with hosting, and it is very trusted and the best in the industry. You can visit Hostinger.com and choose a plan for your website. Purchase a Plan with the free domain name, and you get redirected to your Hosting panel.
WordPress And A Theme For WordPress:
The most widely used platform to start an online store on any website is WordPress. Many business owners and well-known writers use WordPress to power their websites. The biggest advantage of utilizing WordPress is that you can build your website with a tonne of free themes.
WooCommerce:
A WordPress plugin called Woocommerce is used to create online stores. Anyone can use Woocommerce for their website because it is free to use.
How To Install The WordPress:
Following your domain name and hosting web purchases, the next step is to install WordPress. To accomplish this, follow the instructions below.
- You must go to your Hosting Panel to install WordPress.
- Check the “Launch your website” option after that. Although several platforms are available, including Wix, Weebly, and Squarespace, we advise using WordPress because it is quick and straightforward.
- Next, select Install WordPress once more after clicking the WordPress symbol. WordPress will then be automatically installed on your hosting after that.
- During the installation process, it will ask you for your email address, WordPress username, and a strong password. Once you’ve entered all the essential details, WordPress will begin to install.
After installing WordPress, you need to make a few adjustments, such as renaming your website, adding a contact us, about us, and privacy policy webpage, and registering your website with Google Search Console and Google Analytics. Ensure that “anyone may register” is enabled in the configuration option so that customers or visitors can create accounts on your website or online business.
How To Install WordPress Astra Theme:

Installing a visually appealing theme for your online store comes next; many free themes are available on WordPress, but we’re going to pick Astra Theme. Check out the instructions for installing the Astra theme below:
- Download the Astra theme first; you will receive a ZIP file including the theme and all relevant files, such as the license.
- The second method is to use WordPress to install a theme. To do this, click Customize and then click on themes.
- On WordPress, you can find a search bar and a few feature themes by typing in “Astra.”
- Once you have the theme, click on theme to install it; after installation, click on activate to verify that the theme is active.
How To Install Woo-commerce:
Following the theme installation, you must now install the woo-commerce plugin to start an online store. You can get woocommerce from their official website, woocommerce.com, and install it there. Additionally, it is accessible via the WordPress dashboard.
- To install from the WordPress dashboard, go to the Plugins area and type “woocommerce” into the search bar. Install and activate a Woocommerce plugin.
- Ensure you check all the boxes that woocommerce wants you to during installation. The Shop Page, Cart Page, and My Account Page are just some important pages that will be automatically created for your online store.
- You need to install other plugins such as Rankmath and Yoast for website analytics, and you should use Jetpack.
Build Your Online Store From Scratch:

The primary phase is beginning to develop an online Store after installing a few necessary plugins and the Astra theme. There are two processes to creating an online store: creating the store from scratch and using startup templates that come with the Astra theme.
The second alternative, building an online store from scratch, is an option if you don’t want to employ templates. You must design some store designs, add your products one at a time, and develop an appealing site for your store if you start from scratch.
Elementor, a WordPress page builder, can help you create a visually appealing homepage. Elementor can be installed from the Plugins section. You can create a New Layout and begin designing after installing Elementor to optimize the page and interface of your online store.
Set Up Your Online Store:
Setting up your online store, which includes shipping costs, tax information, payment options, adding Your Products, and more, comes after creating your store from scratch. Before beginning any of these procedures, you must first access your Woocommerce by selecting the woocommerce option.
Shipping:
If you are providing physical products online, setting up delivery is crucial. You must first click on WooCommerce and then select Setup Shipping.
After that, you must first add the shipping zone. It indicates which nation or nations—such as the United States, Australia, Canada, and others—you must consider while shipping your goods.
You may use Google to find out how much it costs to transport goods to other countries by adding each country or state one at a time and then adding your shipping fees. You can utilize several techniques or services if you don’t want to use Woocommerce’s shipping options.
Taxes:

The following step is setting up taxes. You should set up tax records based on your customer’s shipping address or payment information. In a shipping tax class, choose the shipping tax class and choose the exempting tax choice in the price that is presented in the store, in the cart, and at the confirmation.
The next step is to establish taxes for various nations. Different tax laws and percentages apply in every nation. To determine which country is ideal for you and has the lowest taxes, you must click on the standard selections in the Tax option.
You will receive a table with space for inputting the city, rate, state code, and more. Click the insert row to add this; then, enter the appropriate country code, such as the US for America, the UK for the United Kingdom, or AUS for Australia.
The next step is to add the tax percentage; the tax rates for products vary by country. Check the tax rate applicable to your products in your country; if you sell clothing, your nation has a designated tax rate. Look it up on Google and enter the tax rate for your country. It is up to you whether to provide tax rates broken down by nation and state.
Set Up Your Payment Method:
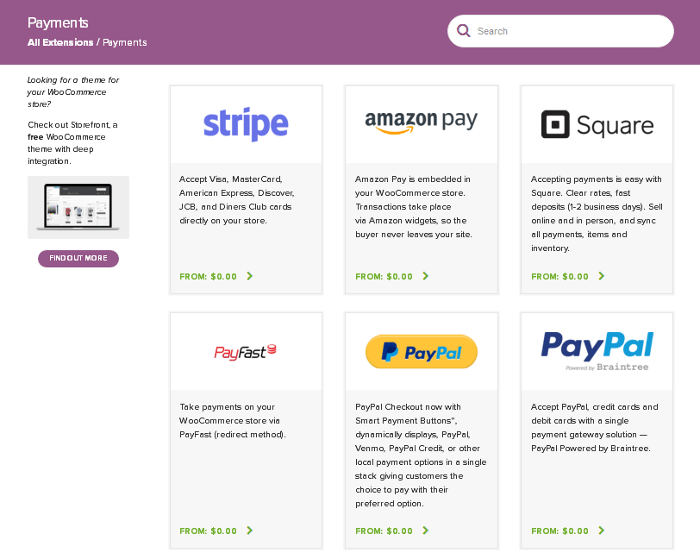
The next step is setting up payment options so that your store can take online payments. Numerous payment methods are available through WooCommerce and are simple to set up. To do that, adhere to these steps:
- Select the “Payments tab” from the WooCommerce » Settings page.
- You can select from PayPal Standard, Cash on Delivery, Checks, or Bank Transfers by default.
- Installing Stripe, PayPal Checkout, and WooCommerce Payments are options you can find by scrolling down. As payment alternatives, we advise selecting Stripe and PayPal Standard.
You can click the Setup option and enter the necessary data for each payment gateway. Also, press the Save changes option to save your payment choices.
Add Products:
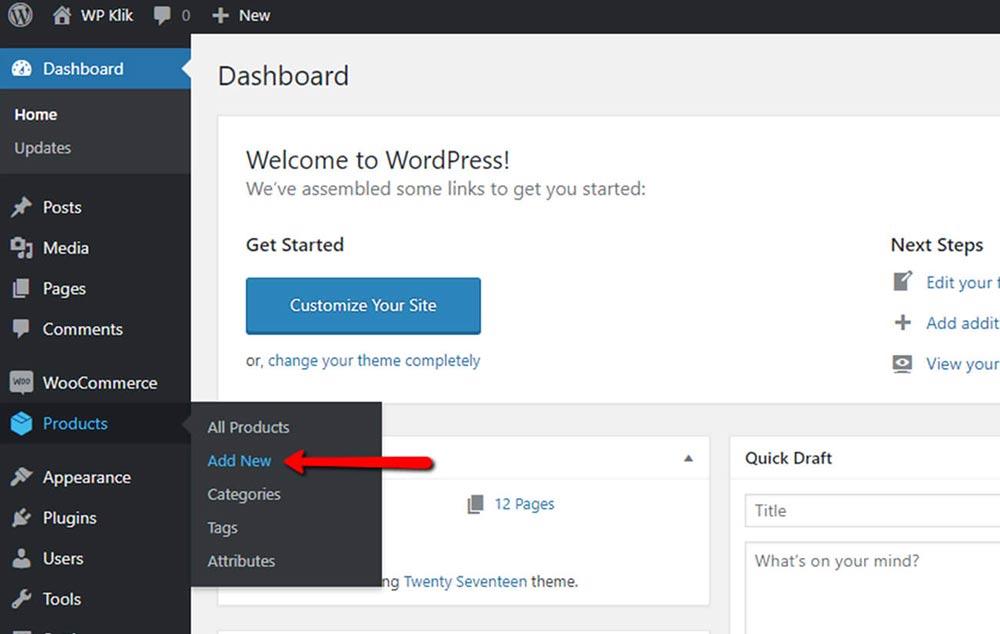
The following step is to add your products after selecting the payment method. Simple products, affiliate products, virtual products, and downloadable digital items are the four categories of things you can add to your online store.
A brief product description and images are required before you can add a product.
The WooCommerce dashboard has an additional new product button that you can use to add your product. To Add your product, follow these easy steps:
- Choose a type of product (i.e., clothing or digital software ).
- Next, provide the name of your product.
- Decide on the price at which you’ll sell your goods.
- Now, you’ll have to include the SKU ( this is only for warehouse Purposes ).
- Add a short and long description of your products at this time.
- You may now select “Product Gallary” from the right sidebar. Upload the image you want to upload as part of your product photos.
- When a product is finally published, it becomes online and is viewable in real-time on the internet.
Promoting Your Online Store:
You may begin focusing on promotion for your online store once it has been set up. You should have more visitors to your online store if you want more buyers for your product. There are a few of the greatest strategies you may use to increase the number of clients who visit your online store.
SEO:

SEO is an Organic or unpaid method of marketing that includes optimizing your website for Google and other global search engines. This involves using the correct keyword in your web content, metatags, product descriptions, etc., to ensure that your website shows up as high up on the SERP as possible when a potential customer searches for a product you offer.
Advertising:


You can use Google Ads or other global PPC networks to promote your online store. This may entail targeting customers with display ads, video ads, or text ads that link to your website when they search for related or relevant keywords on Google. You also can remarket to potential customers who visited your site previously but did not make a purchase.
Social Media Marketing:

You have another option which is social media platforms such as Facebook and Instagram, to increase brand publicity and drive traffic to your online store. This involves sharing engaging content, such as blog posts, images, and videos that link back to your website or product pages. You can also run social media ads on these platforms to reach a wider audience.
Email Marketing:

The chosen audience can be reached effectively with email marketing. With email marketing, you may send updates on your content, product offers, and new product launches to a list of focused customers.
In order to obtain their email addresses and receive a free ebook, people can submit their names and emails. Email automation systems enable you to send emails to a large list of your consumers.
Conclusion:
The process of building up an online store is simple, but the success of your marketing, website experience, and products will determine how many sales you make.
You may begin your online journey by following our simple instructions for creating an online store, putting it up, and promoting it, which will help you increase sales and win more customers’ trust.
Hope you have found this guide on building an online store in less than 1 hour informative and useful; if you have any questions related to this article, then please feel free to add your candid feedback in the given box.

